
Confession guys – I was a Chalk Paint® virgin until a few weeks ago! I honestly don’t know why I didn’t jump on the bandwagon sooner! My experience was painless, easy and beautiful! I am fully converted!
There is a lot of information out there from the Pro’s on using Chalk Paint®, but I just wanted to throw my tips and tricks that I learned using Chalk Paint® decorative paint by Annie Sloan, before I get into he transformation of my bedroom furniture!
Choosing your Color
– Annie Sloan Unfolded has crazy good color choices! Be sure and test out the color though, because the undertone of the color you choose will come out more when it drys. You can see all their amazing colors HERE!
– You can MIX colors! I didn’t know this when I was choosing my colors originally, but it is possible and would have really opened up my choices! A lot of boutiques that carry Chalk Paint® decorative paint by Annie Sloan will actually sell small sample sized containers, that way you don’t have to buy full container of the color you are using to tint.
Painting / Sanding
– You can paint with any brush, but the key to painting fast is using one of their brushes. I learned this tip from my amazing friend and contributor Adrienne from Chic California! I tried using a basic brush, just to compare the two and you really can tell a difference. I was shocked how fast I was able to cover all my surfaces using their brush!
– Chalk Paint® is pretty fool proof! It’s almost impossible to mess up. It covers so easy and if you bump it and make a small mark, then you can just go back and paint that area and it won’t be noticeable once it dries. No trying to perfectly paint each layer the same!
– On the areas that you are going to sand – don’t waste paint! If you already know that you are going to come back around and sand the edges, then don’t paint it as thick! Maybe only do one good coat on those areas! Not only will it save you paint, but it will save you sanding!
– On that note, sanding Chalk Paint® is the easiest sanding I have ever done in my life! Be prepared for your ground to look like you smashed a bunch of pieces of chalk! Chalk Paint® sands so smooth and takes very little effort! I used a 220 and 180 grit sand block – mostly the 220. It sanded so easy that my single block was more then good for all 7 seperate pieces that I had to sand!
– How many coats should you do? That really just depends on how dark you want the color and how roughed up you want your piece to look. I would suggest 2-3 coats!
Waxing / Buffing
– Annie Sloan offers a Clear Soft Wax and a Dark Soft Wax. Their soft wax is meant to accompany their Chalk Paint®. The purpose of the Wax is to give it a protective finish, as well as giving it a Matte Finish.
– You can add paint to the Clear Soft Wax to tint it! How cool is that?!? Be sure and test it on a scrap piece of wood, before jumping and doing your whole piece!
– Majority of the time you will apply a coat of Clear Soft Wax, before using the Dark Soft Wax. But, if you’re not 100% sure what kind of finished look you want, then just test it. Take a 3 scrap boards and paint them aside your project. Then, before waxing your pieces, test the wax finish order out on the scrap boards. One the first one just a do Clear Soft Wax, on the second one do a coat of Clear Soft Wax, then finish with a coat of Dark Soft Wax. And for the last board do a coat of straight Dark Soft Wax. I actually hadn’t intended on going straight to the Dark Soft Wax, but I fell IN LOVE with the Carmel color that my bed and dresser went and I ended up going straight with the Dark Soft Wax.
– If you are just painting a small piece of furniture you can apply the wax with a rag. But, if you are refinishing a big piece of furniture or several pieces of furniture I would HIGHLY suggest getting a Wax Brush! It really does make it so much easier and will SAVE your arms and wrists from a lot of work!
– If you have a second person available to help – I would grab them and give them a rag! About ½ way through apply my Dark Soft Wax my husband came out and starting buffing behind me! It made things move SO much faster!

Okay – now onto my Master Bedroom Furniture Makeover! WooWoo! We got our old bedroom set 3 years ago on a killer deal. We’d been married 5+ years and had never and a bedroom set. So, at the time I was totally stoked!
But, it literally showed EVERY single little finger print that touched it and it looked dusty 5 minutes after I dusted! I just couldn’t keep up with it!
When we moved up here I knew there was no way I was keeping it the way it was. So, when we unloaded it from the U-Haul it stayed in the garage until I painted it.
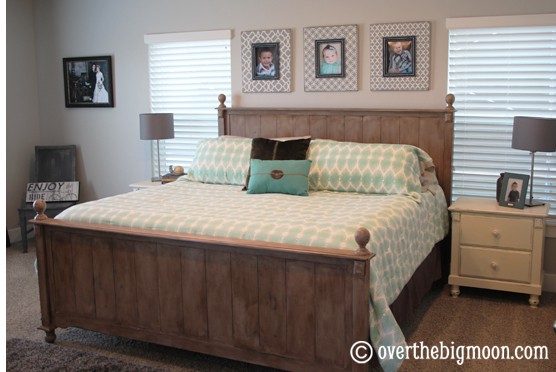
Below is a before picture in our old house and then the after picture in my new bedroom!

Amazing, right?!? I am beyond thrilled with how it turned out! The bed is now a big statement piece in my room, instead of a just a dust collector! I love all the different texture in it!
For my bed and dresser I started out by painting it with Paloma in addition the the Dark Soft Wax. Being that I was going to be using a Dark Wax and I knew I wanted my pieces to be really Shabby Chic, I wasn’t as stressed about getting perfect coverage. So, for those two pieces I did two coats of the paint and then one coat Dark Soft Wax and one final coat of Clear Soft Wax.
The Paloma had a small Lavender undertone, which was super pretty, but not right by itself for my Master Bedroom. You can see it in this process picture. Isn’t it amazing what a different the Dark Soft Wax makes when put straight on the paint? Oh – I still get happy looking at the finished color. I just love it!

I love that you can not only see some of the black peaking through, but you for sure can see the warm gray color of the Paloma too!


The texture on the top of the dresser is my favorite!


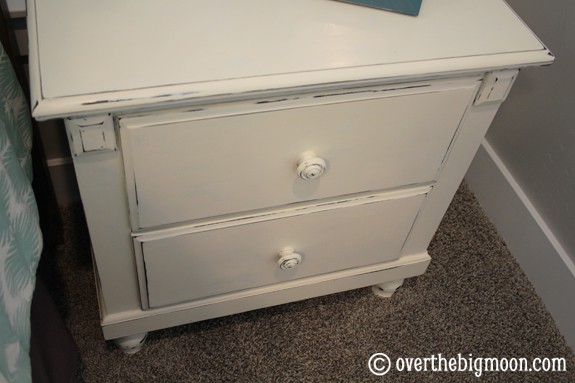
For the nightstands I started out by painting them with Old White in addition the the Clear Soft Wax. Because I was covering black with white I decided to do three coats. I finished them with two coats of the Clear Soft Wax!
Honestly, the Old White has a little more yellow undertone then I would like. I may go back and add a coat of Pure later down the road, once I get the other million projects done in my new house! It isn’t super apparent all the time. It really does just matter on the sunlight coming in the room. I also think it is more noticeable, because my baseboards and trim are WHITE WHITE!


I am beyond happy with how everything turned out! I now have like 5 other pieces of furniture that are waiting for a makeover!
I loved using Chalk Paint® decorative paint by Annie Sloan! Her products are top of the line! Be sure and check out Annie Sloan Unfolded on Facebook fan page, Twitter, and YouTube for more tips and tricks! Also you can Find a Retailer or Stockist in your area by click on that link!

Annie Sloan Unfolded provided me with compensation for this post. However, as always, all thoughts and opinions expressed are my own.
furniture warehouse
This web site certainly has all the information and facts I needed about this
subject and didn’t know who to ask.
Jess
How has the paint held up over the years you’ve had it? I’m looking to do my black bedroom suite and love how yours turned out.
meagan
Did you let the Paloma paint dry and then put dark wax over it? I have the same color furniture and love how your bed turned out!!
Pam Dana
Yes! It dried completely, then I did a light sand. Lastly, I waxed it with the Dark Wax!! Thanks so much!!
Amber @ DessertNowDinnerLater!
It’s so rustic! I love it!
Lindsay Artsy-Fartsy Mama
SO pretty!! I haven’t ever used chalk paint before, but really want to! Thanks for sharing!!
Better From Scratch
Oh I LOVE how it turned out!!!! Chalk paint is soooo cool! And you’re so talented!
Allison Miller
It looks soooo good! I love it! I’ve been wanting to do the same thing with some furniture. This post makes me feel less nervous about it! Thanks for sharing!!