Every year I give my kids Christmas PJ’s on December 1st for them to wear throughout the month of December. This year I decided to buy some plain pajamas and customize them using Heat Transfer Vinyl and my Cricut Maker! So, without further ado here are my Christmas Carol PJ’s!

I knew months ago that I wanted to go with a Christmas Carol theme for my kids pj’s this year! My husband has an obsession with Christmas music and I thought it would be a fun way highlight that!
I didn’t want to go with song titles, but I wanted the lyrics obvious enough that people would know what song it was.
CHRISTMAS CAROL PJ’S
Items Needed:
– Christmas themed plain pajamas – I ordered the following:
– Cricut Maker or Cricut Explore
– Cricut Iron On Lite – red, white, gray and black
– Easy Press, Iron or Heat Press
– Design Space Project – Christmas Carol Pajamas
Instructions:
Click THIS link to go to the Cricut Design Space of the PJ’s! I went with Silver Bells, Little Drummer Boy and Jingle Bells for the songs! My boys love Little Drummer boy, I love Silver Bells and my daughter loves Jingle Bells! I felt like they were the perfect choices!
If you want to make any changes, then you’ll need to UnGroup and UnAttach the different song lyrics. You can change the words, fonts, colors and also resize the designs if needed! Once you’ve made changes, then make sure to Group and Attach them back together. That’s especially important for the Little Drummer Boy lyrics, so that they’ll stay in place. It makes it SO much easier when applying the different layers of Heat Transfer Vinyl (HTV or Iron-On)!
Once you’re all ready to cut the HTV, then click ‘MAKE IT.”
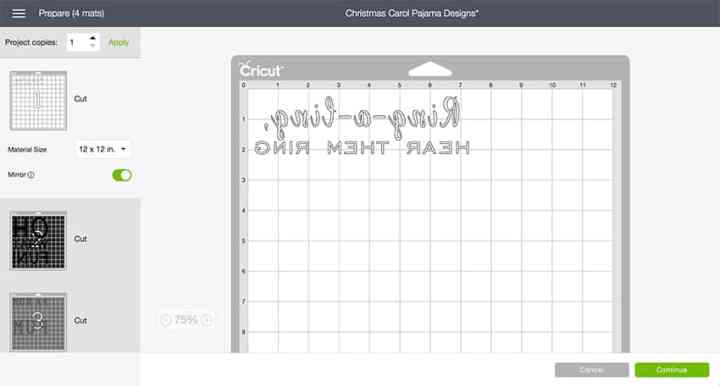
It will then show 4 different mat cuts (one for white, red, black and gray). You’ll need to click each mat layer and MIRROR the image! This is a must when cutting HTV! It will show the mirrored image in your preview (shown below) when it is done.
Once they were all mirrored and ready, then hit Continue!
You’ll need to set your material to Iron-On! At this time it should give you another reminder to make sure the images are mirrored.
Make sure when loading the HTV onto your mats, to put the SHINY SIDE DOWN! This is probably the most common mistake to make when working with HTV!
Then follow the promptings on your Cricut machine to load the mats, etc!
Once all the designs are cut, go ahead and weed the designs. Your design will stay on the shiny piece of plastic.
Get your Easy Press, PJ shirts and a towel ready!
Preheat your Easy Press to 305 degrees for Cotton pajamas. If you’re using a different material, check out this Quick Reference Guide on the Easy Press to see heat suggestions and times.
Heat the surface of the shirt before setting the vinyl down. Then use a ruler to help you place the design centered and straight!
I held by Easy Press on my iron-on for 30 seconds pushing firmly.
When it’s done, allow it to cool for a few seconds. Then SLOWLY start removing the plastic sheet making sure that the HTV is strongly attached to the shirt now. If you feel it is needed, put the plastic sheet back down and apply some more heat!
For the Little Drummer Boy design, you’ll need to apply ONE color at a time.
I started with the gray HTV first. I thought it was important to line up the top first. After that design was down, I removed the plastic sheet. I then put the red HTV in place. Before applying any heat to the red HTV, you will want to cover up any other HTV, so I put the old plastic sheet from the first layer over the initial design. Does that make sense? Basically make sure the Easy Press doesn’t lay directly on ANY of the HTV!
That’s it! You’re done!
I’m super happy with how they turned out and my kids love them too! Woohoo!
I am literally OBSESSED with the Easy Press you guys! For those of you that have tried applying HTV with an iron know that it can be a bit tricky. You need to constantly be moving the iron around and pushing down as hard as you can. And then you’re basically guessing as to how long you need to apply the heat.
The Easy Press takes all the scare out of customizing items with HTV!
You can view my DIY Candy Target Parade Shirt, and DIY Iron-On Sewing Bins for more tutorials using the Easy Press if you still have any questions!
Hope you loved these! If you did, I’d appreciate it if you wanted to pin the image below!
Also, Cricut is giving away a Cricut Maker! Make sure and enter today!! GOOD LUCK!
This is a sponsored conversation written by me on behalf of Cricut. The opinions and text are all mine.


Kim
All of these jammies are SO cute!