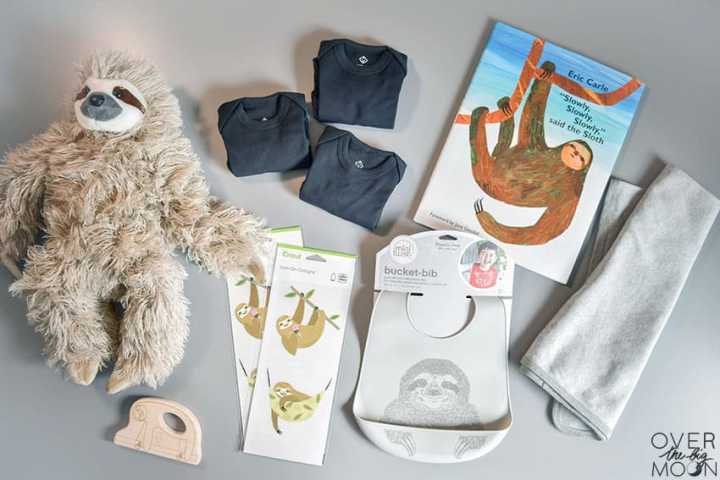
This fun Sloth Themed Baby Gift Idea is so adorable and can be perfect customized for a boy or a girl! What mama to be wouldn’t love receiving this adorable gift?
BABY SHOWER GIFT IDEA:
Hey friends! I’ve got fun baby shower gift idea for you today! Who else is loving the sloth trend right now? I’m obsessed with these little sloth images – they are beyond cute! When I first saw them they immediately stuck out to me! So, when I had the need to put together a fun baby shower gift, I jumped on the chance to use them! Thank you to my cute neighbor for having a baby!! hehe!
The whole gift basket was super easy to put together! It took me about 15 minutes to customize the onesies and blankets and then another 10 minutes to put together the gift basket!
SLOTH BABY GIFT BASKET:
Here are the links to the items I put in the gift basket! Feel free to omit and add anything you’d like!
- Baby Onesie (color of your choice)
- Baby Blanket(s)
- Sloth Stuffed Animal
- Slowly Slowly Slowly said the Sloth by Eric Carle
- Sloth Baby Teether
- Baby Wash
- Baby Lotion
- Bottle
- Sloth Baby Bib
- and anything else you want!
Supplies needed to customize blankets and onesies:
CRICUT IRON ON DESIGNS:
Cricut currently has a little over 50 designs available, with LOTS more coming!
There are two sizes – Large and Small! The designs themselves are all different sizes. So, for example, a Large Design may be one big design or it may have a few coordinating designs on the clear iron on sheet. The large designs come on a 8.5″ x 12″ sheet!
Same goes for the Small Designs – they may be one design or multiple small designs on the sheet. The small designs come on 4.25″ x 12″ sheets!
How cute would all these be on a baby onesie, romper or shirt? I used the #Hangry one on a shirt for my 8 year old and he LOVES it!!
For more details on Cricut Iron Designs make sure and check out this post this post!
HOW TO APPLY IRON ON DESIGNS:
Supplies Needed:
As I mentioned above, you’ll need the following:
- Garment of choice (i.e.: onesie & blanket)
- EasyPress or Home Iron
- EasyPress Mat
Application Instructions:
When you remove your Iron On Design from the packaging, the design will be attached to a clear iron on liner.
To apply with the EasyPress:
Get your Sloth Iron On Design and cute the designs into two.
Place your onesie (or blanket) over the EasyPress Mat. Use a ruler to place to help you place your design on your garment where you want it.
Before you do your final placement, preheat the area with your EasyPress for 10-15 seconds. You will place it with the design down on the garment and the clear liner on top! It will visually look just like you want it to when you’re done.
You will want to reference the EasyPress Recommended Settings Page to find out exactly what heat temperature you should set your EasyPress to and how long you should apply heat to your design.
For use with a towel most materials want a 340 degree heat setting for 50 seconds
Once you apply heat to the top of the design, flip the garment over and apply heat to the back of the surface for 15-20 more seconds.
Allow everything to cool completely and COLD peel the plastic lining off the design. If you peel it while the design is still warm the clear liner may not pull off great!
To Apply with an Iron:
Turn the Iron on and make sure the steam setting is off.
Preheat the area you are wanting to apply the design to for 5-10 seconds.
Apply your Cricut Iron On Design to the surface with the plastic lining up and place a teflon sheet or thin towel between your design and the Iron.
Use the iron with firm pressure all over your design for approx 50 seconds. Because the iron isn’t as big and because it doesn’t have consistent heat on the heat plate, you DO need to constantly be moving it. This is one of the major reasons I prefer the EasyPress.
Flip the surface over and apply heat to the back of the surface for 15-20 more seconds.
Allow everything to cool completely and COLD peel the plastic lining off the design.
If the design is not transferring all the way, apply heat for an additional 20-30 seconds!
How cute did all the customized onesies and blankets turn out? It literally took me like 5 minutes to make both onesies and both blankets!
Now it’s time to put together this adorable gift basket!
You can find the links to all the items I put in the gift basket above! There were even more cute ideas on Amazon too! If you wanted to eliminate a few of the smaller items, you could also add some diapers in there! They take up more space! The super cute metal basket I got at Target!
Looking for some more fun Cricut projects?
- Living My Best Life T-Shirt Design w/ Patterned Iron On
- DIY Kids Basketball Shirts using Cricut SportFlex
- DIY Iron On Sewing Bins
- DIY Vinyl Tumbler Designs for Moms
- Cricut Maker Review
- How to Apply Cricut Iron On Designs
If you love this fun idea, I’d love it if you pinned the image below!
This is a sponsored conversation written by me on behalf of Cricut. The opinions and text are all mine.


Leave a Reply