
Come learn How to Use the Print then Cut Feature in Cricut’s Design Space program! This feature opens up a whole new creative world for Cricut users and is highly under used!
This is a sponsored conversation written by me on behalf of Cricut. The opinions and text are all mine.

CRICUT PRINT AND CUT
The first thing you need to know about the Print then Cut feature is that in order to use this feature, Cricut recommends an InkJet Printer. The reason Cricut recommends this, is because the Print then Cut feature is used a lot with their Printable Vinyl and Laser printers use heat and it can ruin the Printable Vinyl. I have used my HP Laser Printer when printing on Cardstock and it’s been fine, but do know that Cricut does recommend and test this feature using an InkJet Printer.
The Print then Cut feature works with both the Cricut Explore Air 2 and the Cricut Maker! When using the Cricut Explore Air 2, it is recommended that you print on all WHITE. When using the Cricut Maker, you can use white AND light to medium colored paper.
HOW DOES THE PRINT THEN CUT FEATURE WORK?
After you have finished the design process, Design Space will prompt you to print the design. When it prints the design, it will also print a black box around your design. This box is actually a sensor marker for your Cricut cutting machine to read and tell it where you design is.

PRINT THEN CUT CRICUT
There are many designs within Design Space that are already designed to be used as a Print then Cut image. You can find them by clicking IMAGES in Design Space. Then hit FILTER in the top right hand corner and checking the PRINTABLES checkbox! This with filter out only images that are pre-designed to use as a Print then Cut image. You can also tell they’re a printable image, because underneath the image it has a printer icon underneath it.

How to make the image printable:
You can make any Design Space file into a printable image by changing the Fill in Design Space. Or if the image has multiple layers, then prior to changing the line type, you will want to flatten the layers together.
PRINT THEN CUT INSTRUCTIONS:
Let me walk you through a couple of scenarios using Print Then Cut.
Here is a design that was made and all the different layers are set to only CUT.

So, to convert it to Print then Cut file, you can do it two ways. The first way is to select all the layers and then just hit the FLATTEN button in the bottom right hand corner. When you do that, it changes it to a Cut and Print file (as you can see in the side layers bar).
The other thing you can do is choose which layers that you want to change to Print then Cut.
You do this by selecting the layer you want to change, and hit the drop down menu under on the menu bar.

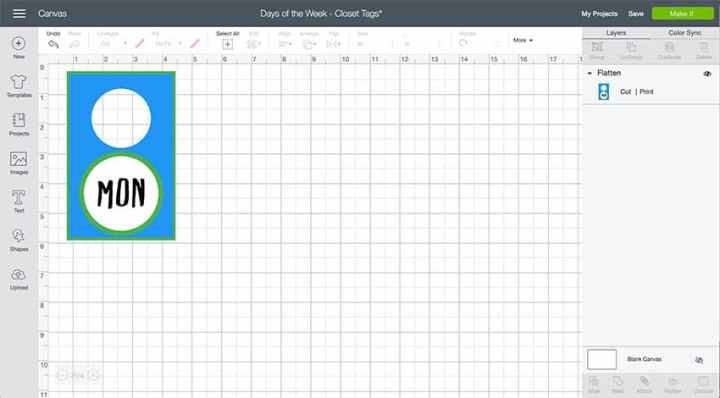
So, in the this Design Space file I wanted the word MON printed on the white circle, but the circle, blue hanger and green layer all just cut. You’d do this to a design where you want the texture and layers visible. So, I then select the white circle and MON layer and change their FILL layer to PRINT. And then I flatten them.

Doing that will make it so, the word MON will print on the white circle and the other layers will just cut. When sent to mat, it will look like this.

HOW DO YOU ADD A PATTERN IN DESIGN SPACE?
One of my favorite features when using Print then Cut feature is using Design Spaces patterns. You can fill any shape with one of their MANY patterns. After you have changed the Fill of an object to print, then just click the Color/Pattern Square to the right of the Fill dropdown menu. From there it allows you to change the color or you can use the drop down menu to load the Pattern option. Then from there, just scroll until you find a pattern you like.

In the above Design Space file, I’ve addd Patterns to Tues, Thurs and Sunday!
Once everything is ready and each tag is flattened, it will look like this when sent to the Mat Preview screen.

As you can see the Black sensor box is around each closet tag and they’re ready to be printed and then cut!
When you hit ‘CONTINUE’ in the bottom right hand corner, select your machine from the drop down menu. Then it will then prompt you to print the design.
Print the design and then place the paper on your LightGrip Mat in the top left hand corner and feed it into your machine. Hit the ‘C’ button on your machine. After you feed the mat into your machine, the machine will start to scan the sensor marking around your design. Then it will cut out your design perfectly!
TIPS FOR USING THE PRINT THEN CUT FEATURE IN DESIGN SPACE:
- The maximum image size for Print Then Cut is 9.25″ x 6.75″ and the default material is 8.5″ x 11″.
- When printing, Design Space will, by default, give your image a bleed. That means that it adds a little more of your design to the edges. By adding that, it allows for a more precise cut around your image. You do have the option to turn it off, but I personally don’t suggest it. If in the preview, your image looks a bit fuzzy, don’t stress. It’s just the bleed preview! Reference the picture below to see how the bleed looks after the design is cut.
- If your machine is not cutting precise, then make sure that your paper is in the top left hand corner of the mat. If you’re still having issues, I suggest running the Print then Cut Calibration.

Looking for other Cricut Educational Posts?
- What Cricut Accessories Should I Buy?
- Everything You Need to Know about the EasyPress 2
- Cricut EasyPress 2 Questions ANSWERED
- Tips for Using Iron On Vinyl
- Everything You Need to Know about the Cricut Rotary Blade
- Cricut Knife Blade 101
- How to Apply Iron On Designs
- How to Use Cricut Patterned Iron On
- All about the Cricut Maker
Follow me on INSTAGRAM, PINTEREST, TWITTER and FACEBOOK for recipes, DIY’s and more!
Don’t forget to pin these Cricut Print then Cut Tips and Tricks!

Leave a Reply